Digital Post Production
on Dec 16, 2014Today's photographic tip is not going to be focused on the original image but I am rather going to be focusing on something completely different, the post-processing of an image, and to an extreme extent at that!
Digital processing is becoming a major part of "new world" photographers, creating fine art images that hardly resemble the original photograph but have a completely different feel and impact to just capturing the original moment.
To create images like this one, a basic knowledge of Adobe Photoshop is required, knowing how to create a new layer and creating masks from that layer etc.
The original image was plain and simple, a nice close up of a lion's eye, and I mean close! This lioness was literally 1 meter in front of my vehicle. She was standing on the raised bank of a small dam, giving me the slight elevation needed to capture the fully lit eye. It is important to have no shadows over the iris, showing all the detail with the lively sparkle of the sun in the eye - so early morning or late afternoon light is critical. I took the image with a Nikon D3s at 400mm with a Nikon 200-400mm f4 lens set at f4.
The original image was great, but how many times has one seen images of a close up of a lion's eye? So for this image I wanted to achieve something completely different.
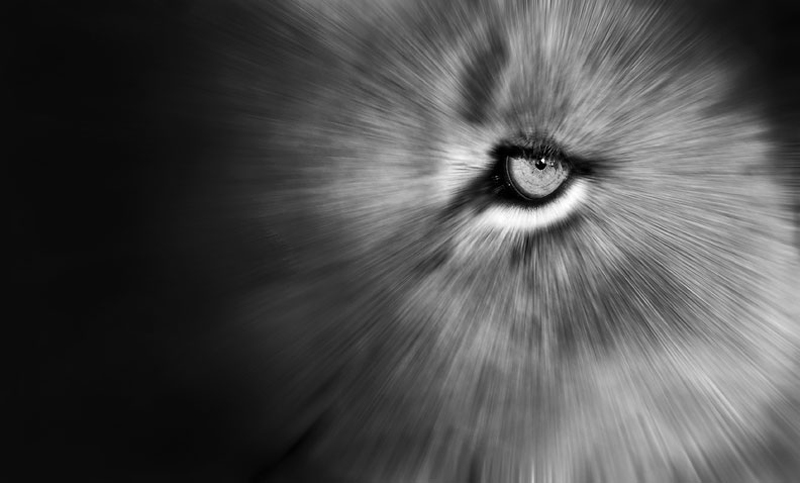
After editing the basics in Adobe's camera RAW, I imported the image into Photoshop CS5 and immediately created a new layer. I then added a filter known as radial blur and in this filter I selected zoom mode, positioning the blur centre over the eye of the lioness. The amount of radial blur can be adjusted by moving the slider either left or right. Click ok and let the magic begin; the entire image will be blurred, including the eye. The only important thing at this stage is that the blur centre is in the centre of the eye.
The next step would be to create a white mask over the radial blur layer. This would allow me to paint in the background layer of the eye of the original image. Select the brush tool and a size brush and density of brush that will suit the application. Making sure the foreground colour in the tools palette is black, paint over the eye making sure you have selected the radial blur layer, and with one stroke of the brush the original eye will start to reveal itself. Once the desired amount of the original eye is exposed, one can move onto the next step. If too much of the eye is revealed, simply change the foreground colour in the tools palette to white and paint the radial blur back in until the desired results are achieved.
I then added a black and white adjustment layer. The image then changes to black and white, but the nice thing about working with layers is that the original image is not affected. I changed the settings of the black and white layer by moving the colour sliders to the desired positions.
The basic image then starts to be visible - but for an extra effect I duplicated all these layers and flattened that image. Now I had the baseline image. I then selected the burn tool and set the exposure to a very low 10% or lower and set the range between shadows and midtones. This means the burning will only affect the shadows or the midtones of the image respectively. With a medium brush size and a hardness of 0%, I started burning the edge of the image, making sure not to overdo it. With higher exposure values the effect is faster but can be very destructive. The key to this is to duplicate the layer as you go to prevent doing permanent damage to the pixels. Long hours are usually put into images like this, so patience is the key; and reading up about dodging and burning non-destructively would benefit one greatly.
Most of the time just playing around and experimenting in Photoshop leads to great results.
Stay focused
Darred Joubert

